Danny Malter
VP Data Science and Machine Learning - Intellicheck
M.S. in Predictive Analytics - DePaul University

Me
Malter Analytics
GitHub
LinkedIn
YouTube Channel
Kaggle
Other Work
Into to Python Course
General Assembly
AriBall
Media
Built In
Guide to Hosting Shiny Apps on Amazon EC2 for Mac OSX
Setting up an Amazon EC2 Instance
-
Create an Amazon Web Services (AWS) account if you do not have one. This can be done using your regular Amazon account information.
-
On the Amazon Web Services page, click on EC2 Virtual Servers in the Cloud.
-
Once on the EC2 dashboard, click the “Launch Instance” button.
-
There are more than one ways up setting up an Instance, but for the purpose of this demonstration, select Ubuntu Server 14.04. This is a free tier 64-bit server.
-
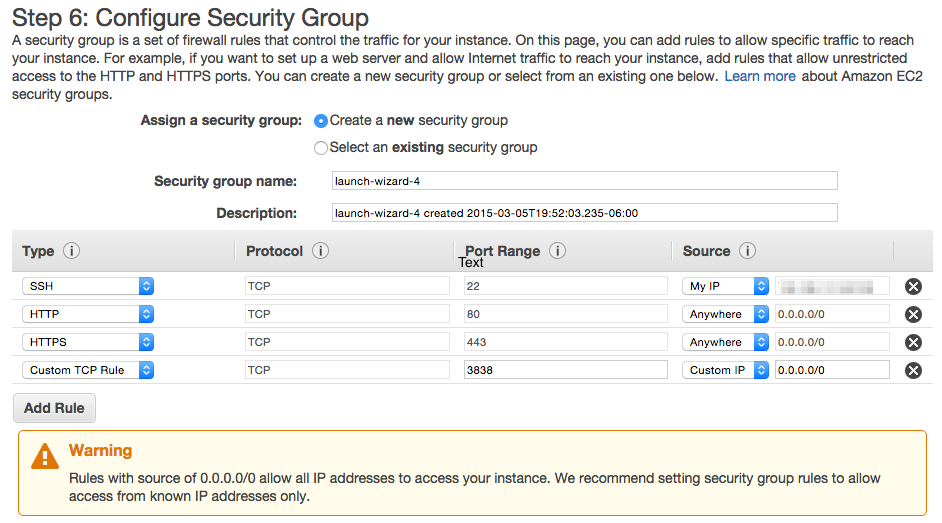
Continue clicking next through the configuration options until you reach Step 6: Configure Security Group. Input the security settings as seen in the below image. The initial SSH setting makes sure only you can access your Amazon EC2 instance to make changes. The HTTP setting allows anyone to access your web application. The last setting connection is for Shiny server specifically. Once you have input all the correct settings, click “Review and Launch”. Just a note that these are suggested options for security, please use discretion and read Amazon EC2 security documentation for additional details.
-
On the next page, you will get a warning about security, but you can just go ahead and click the “Launch” button.
-
Unless you already have an AWS keypair from a previous instance, you will need to create a new key pair and give it a name. DOWNLOAD the keypair and place it somewhere that you will remember. Then click the “Launch Instances” button.
-
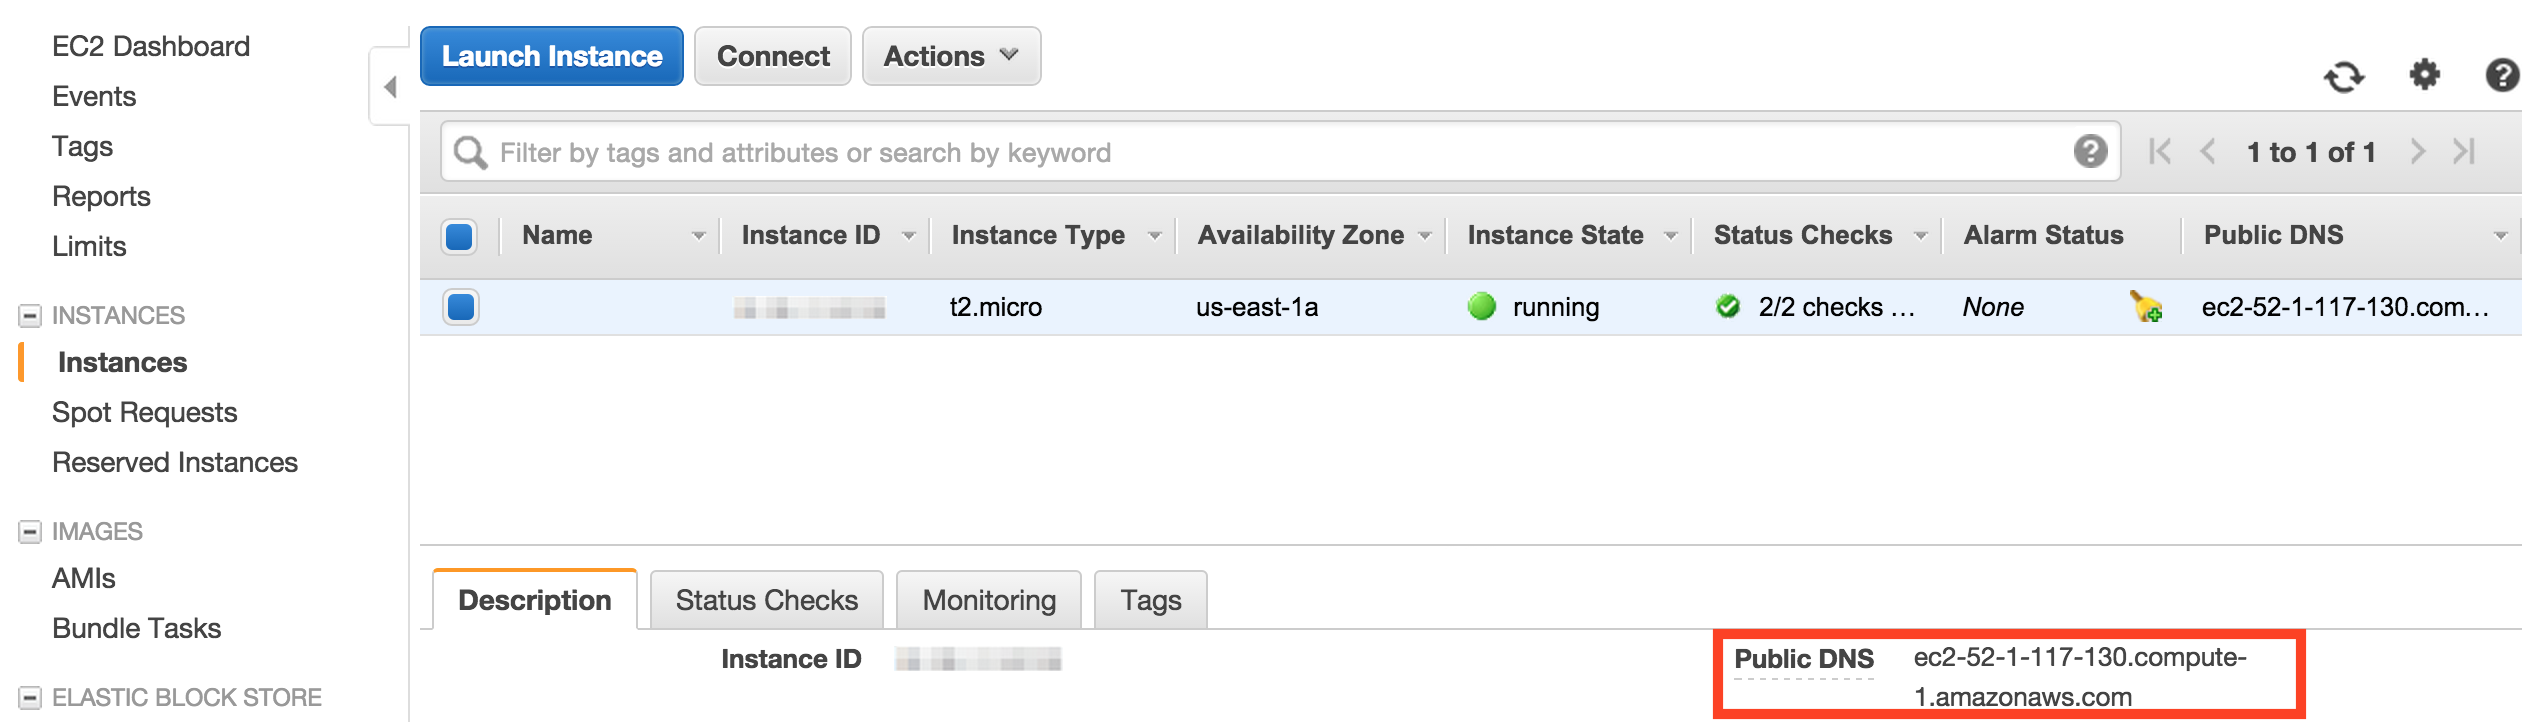
You can click the “View Instances” to see your instance, which should be running with a green circle next to it. By clicking on the instance, you can see useful information, such as the Public DNS that will be used later.
Connect to Server vis SSH
Open the Terminal in your Mac and type the following command:
ssh -i [path to your AWS keypair .pem file] ubuntu@[your public DNS address]
Example:
ssh -i /Users/Malter/Documents/AWSkeypair.pem ubuntu@ec2-52-1-117-130.compute-1.amazonaws.com
You will be promted about whether you are sure that you want to connect, and should press enter.
Install R - Official Instructions
Run the following commands in the Terminal.
sudo apt-get update
sudo apt-get install r-base
sudo apt-get install r-base-dev
Install the Shiny package, Shiny Server, and other packages that you may need. Down the road, other packages can be uploaded through a drag and drop process with and SFTP client and will discussed later.
To install the Shiny package, run the following command in the Terminal.
sudo su - \
-c "R -e \"install.packages('shiny', repos='http://cran.rstudio.com/')\""
To install Shiny Server, run the following commands in the Terminal.
sudo apt-get install gdebi-core
wget http://download3.rstudio.org/ubuntu-12.04/x86_64/shiny-server-1.3.0.403-amd64.deb
sudo gdebi shiny-server-1.3.0.403-amd64.deb
Install an SFTP client to Upload Files
This process can all be done in the Terminal, but a perhaps easier way to upload R files to the Server is through an SFTP client, such as Cyberduck.
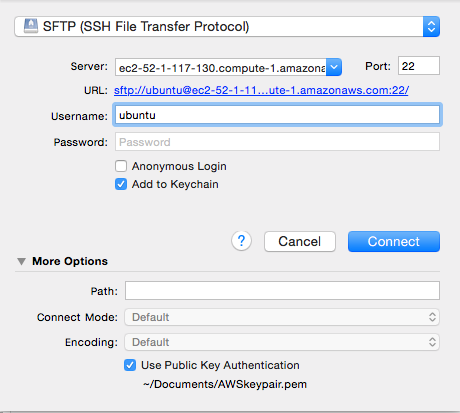
- Once you hav downloaded Cyberduck, click “Open Connection” and select SFT (SSH File Transfer Protocol). Enter in your Public DNS from your Amazon EC2 instance and put “ubuntu” in for the username. Under More Options, check “Use Public Key Authentication” and direct the path to your AWS keypair on your computer. Then click “Connect”
Once connected, you will be automatically placed into the directory /home/ubuntu. Since we have already installed Shiny and Shiny Server, you can go into the directoy /srv/shiny-server to see a sample Shiny application. This is the direcotry where all of your Shiny app files will go.
To give Cyberduck permission in all of the directories within the server, type into the Terminal:
sudo chown -R [Cyberduck username] [directory where you want write permissions]
Example:
sudo chown -R ubuntu /srv/*
There should already be a folder in the /srv/shiny-server directory called “sample-apps”. You can view this sample application by typing into the url:
Example:
http://ec2-52-1-117-130.compute-1.amazonaws.com:3838
Host Multiple Shiny Application through this Server
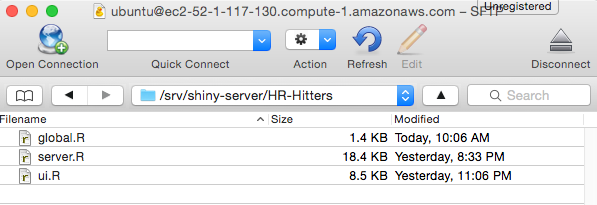
In order to host other applications, simply create a new folder in /srv/shiny-server and drag in the respective ui, server and other files that go with the application. For example, I have created a new folder called “HR-Hitter” located at /srv/shiny-server/HR-Hitters.
Example:
http://ec2-52-1-117-130.compute-1.amazonaws.com:3838/HR-Hitters/
Note: If the ec2 link does not work, it means the Amazon Instance has been turned off. The same app can also be seen <a href=”https://danmalter.shinyapps.io/HR-Hitters”target=”_blank”>here</a> through RStudio.
Upload more R Packages to Shiny Server
As noted earlier, you can upload R packages one of two ways, through the terminal or with a drag and drop method using an SFTP client. We already discussed how to upload a new package in the Terminal, so now i will show you how to upload a new package using Cyberduck.
- The location of R packages on a Mac are in hidden folders. You can see the specific path where packages are located in RStudio if you click on Tools –> Install Packages. To open this folder on your Mac, type into the Terminal “open”” followed by the path to your libraries. This will automatically open a new Finder window to this directory.
open /Library/Frameworks/R.framework/Versions/3.1/Resources/library
- The location of packages in Cyberduck is through the path /usr/local/lib/R/site-library. Typically, you should be able to drag folders from your computer to the site-library folder on Cyberduck, but I came across some security issues preventing me from doing this. To get around that, I typed the following into the terminal, which then allowed me to drag library folders from my computer onto the server.
sudo chmod -R 777 /usr/local/lib/R
Note: This command is through Ubuntu, so you will have to either be connected to your Server or reconnect using:
ssh -i [path to your AWS keypair .pem file] ubuntu@[your public DNS address]
Keeping R up to Date
- You may come across that the Ubuntu version of R is not up to date with the latest version of R. Full instructions can be read on CRAN, but here is a summary. First you need a CRAN mirror and then type the folowing into the Terminal.
sudo su
echo "deb http://www.stats.bris.ac.uk/R/bin/linux/ubuntu precise/" >> /etc/apt/sources.list
apt-key adv --keyserver keyserver.ubuntu.com --recv-keys E084DAB9
apt-get update
apt-get upgrade